Assistant Performer
N.B. This page was archived in November 2010. It was updated in July 2019 so that the audio recordings continue to play correctly. (This meant using the HTML5 <audio> element rather than Shockwave Flash.)The current version of this file is at Assistant Performer v2.
Moritz’s Assistant Performer performs a score, alone or under the control of a live performer. Both performance options, and control texts are available to control performances of particular scores.
Performance options are set in the Assistant Performer, and are independent of the information in the score.
Control texts are written into the score itself. Not only can Moritz’ control texts be read and interpreted by the Assistant Performer, they can also be written into scores using the Assistant Composer.
Note: November 2010
Formally speaking, the code for the Assistant Performer is currently encapsulated in a node in Moritz’ Patch Editor, but it uses a standard patch, and could quite easily be converted into a stand-alone application.
Formally speaking, the code for the Assistant Performer is currently encapsulated in a node in Moritz’ Patch Editor, but it uses a standard patch, and could quite easily be converted into a stand-alone application.
| Assistant Performer |
 Input pins: MidiStream, XMLScoreNamePin, int, int Output pins: MidiStream, int, Rational Back-panel menu location: Shortcut: ap Uses background threads: yes |
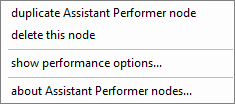
Menu:
|
- Input pin 1: (MidiStream) Receives MidiStream messages from, for example, a MIDI IN node.
- Input pin 2: (XMLScoreNamePin) The score to be performed. This can be connected either to a CapXMLScore node or to an SVGScore node.
- Input pin 3: (int) The number of the first chord which will be performed. If this value is less than 1, or greater than the number of chords to be played, the performance will start at the beginning of the score.
- Input pin 4: (int) Repeat? This integer is treated as a boolean value (0 = false, other values true) which determines whether or not to start again at the beginning of the score when the end is reached.
- Output pin 1: (MidiStream) Sends a stream of MidiStream messages.
- Output pin 2: (int) The number of the chord which has just been performed.
- Output pin 3: (Rational) The logical position of the chord which has just been performed. The logical position is the number of semibreves between this chord and the beginning of the score. This rational number is displayed using an integer followed by a fraction. For example; 1 1/2 or 23 13/16 etc.
This documentation begins by describing score performance patches in general. Having established the general ideas, some examples of scores and their performances are given, followed by a full decription of the Performance Options dialog.
Score Performance Patch
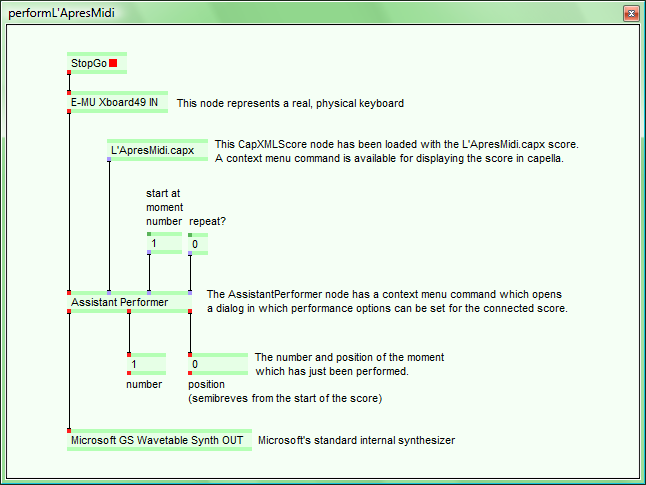
Scores can be played live by a single player, with Moritz acting as an assistant performer, using a patch like the one below. This patch has been loaded with a score of L’après midi d’un faune, but any other .capx or .svg score file could have been used instead. The human performer reads a printed score or plays from memory, the assistant (Moritz) reads and follows the equivalent computer file (L’ApresMidi.capx).
Performance options can be set for the score (from the Performance Options dialog — see below), and the score can contain special written commands (control texts) which can be interpreted by the assistant at performance time.
The assistant’s performance takes place in one or more background threads.
Recording: There are two ways to record the Assistant Performer’s performances:
- by creating a MIDI file, using the output of the MIDIOutputDeviceNode.
- in a Moritz Performance Option (.mpox) file. Commands for recording and playing back .mpox files are accessed from the Performance Options dialog — also see Recording and Playback.
Example Scores and Recordings
Brückner Adagio: (BrucknerAdagio.capx)

The score’s performance options have been set so that the live performer plays the Tenor-Tubas in the top staff (channel 0). The Assistant Performer reads all the pitches, and dynamics are those notated in the score. The pitches and dynamics played by the live player are ignored.
Capella uses a refined set of heuristics for the horizontal spacing, but does not allow the exact position of beats to be tweaked. (Individual noteheads can be moved.) To improve the spacing, one can introduce invisible rests having no logical duration, and I created one of these on the third crotchet in bar 2 to move the triplet further to the right. Moritz ignores duration symbols which have no logical duration.
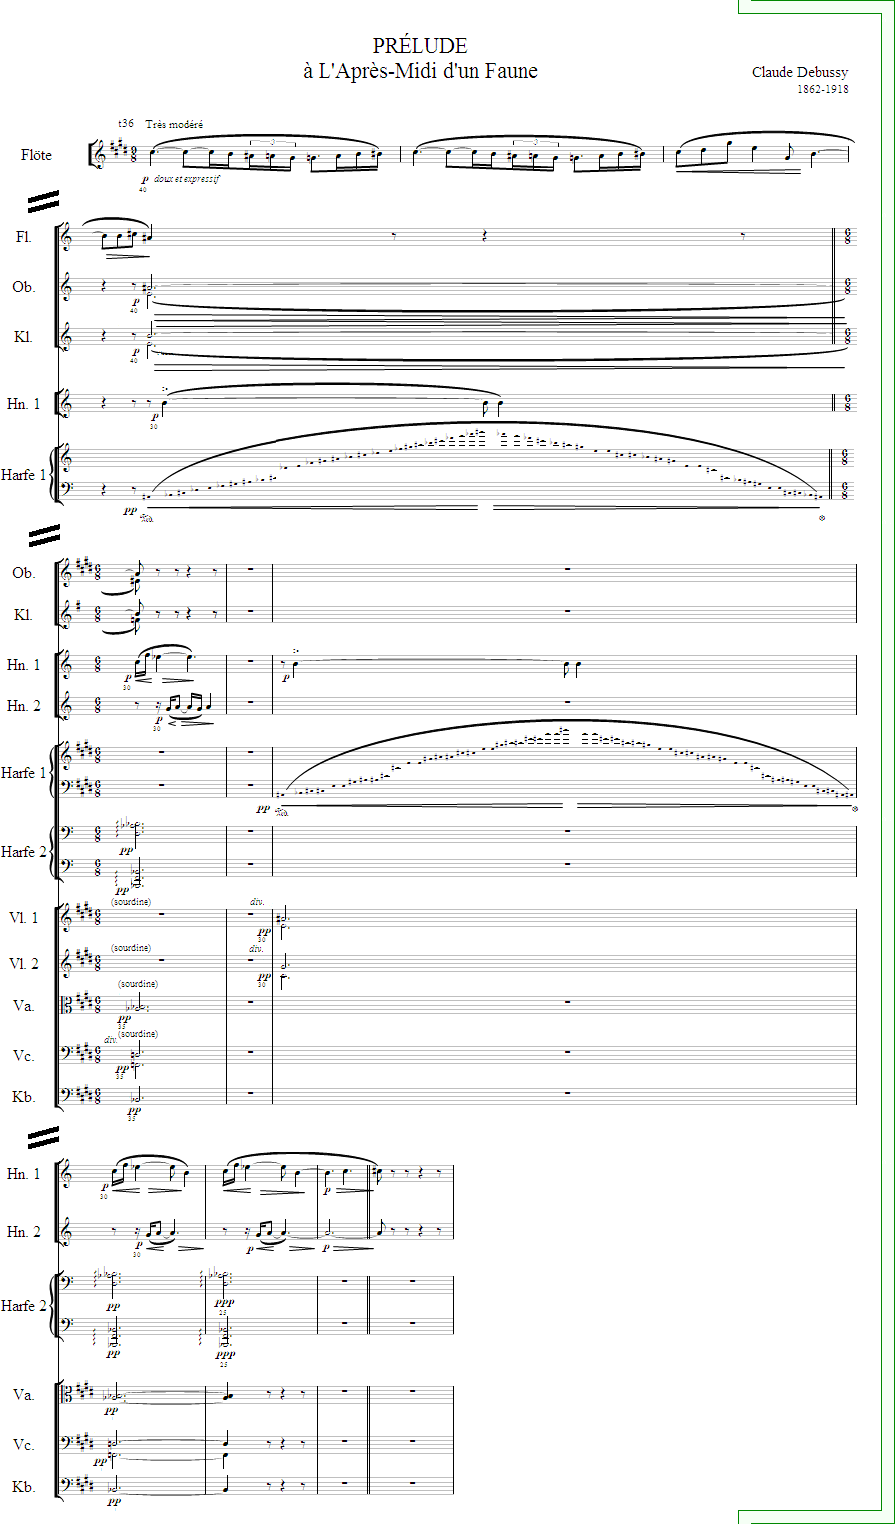
L’après midi d’un faune: (LApresMidi.capx)
1: The harps have been disabled in the score’s performance options. The assistant plays alone.
2: The harps have been disabled in the score’s performance options. The live performer plays the solo flute, the first horn and the first violin. The assistant plays everything else.
3: The assistant plays the score alone, including the harps.
4: The live performer plays the solo flute, the first horn and the first violin. The assistant plays everything else. The assistant's durations are set to be those notated in the score (t36), so they have no relation to the durations of the live performer (see Performance Options). The durations of the grace notes in the harp are automatically calculated from the duration they are supposed to fill. As when conducting, the conductor and harpist have to agree on their timing...
Claire de lune: (ClaireDeLune.capx)

1: The effect of various sliders can be heard in the last third of the performance.
2: I played this in one take with my mouse. I should practice more! :-) Perhaps software like this belongs in classrooms...
3: A performance by capella itself.
Performance Options
Performance Options and Recordings are managed using a Performance Options dialog.
- Conceptually, the Performance Options dialog is a child of a Score Performance Patch window. The Performance Options dialog must be open and visible before the Assistant Performer node will perform or record.
- Opening and closing the Performance Options dialog:
- If it does not already exist, the dialog can be opened using the command in the AssistantPerformer node’s context menu, or by toggling the patch’s StopGo node.
- The dialog opens and closes automatically when, in the parent patch, a Score node is connected or disconnected from the Assistant Performer node.
- The dialog is automatically updated if a new score is loaded into its parent patch’s Score node.
- The dialog closes when the parent patch is closed. It cannot be closed independently of its parent patch.
- The contents of the Performance Options dialog are context sensitive: options and commands are disabled if they are not applicable (for example, a live performance cannot be recorded or performed if none of the score’s staves is allocated to a live performer.) During a performance, the whole dialog is disabled except for a large stop button (see below).
Here is a Performance Options dialog associated with the BrücknerAdagio.capx score:
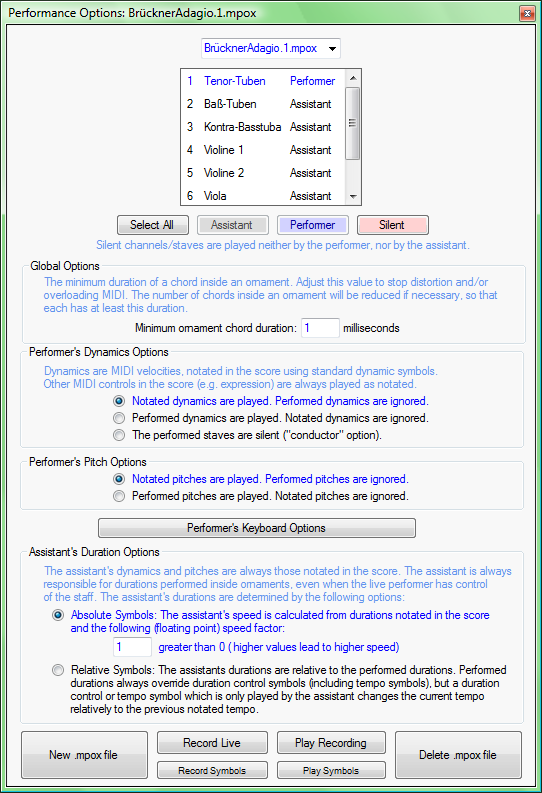
This dialog’s main components are, from the top down:
.mpox file selector (popup menu):

This popup menu contains a sorted list of Moritz Performance Options (.mpox) files
associated with the current score. Each score can be associated with any number
of .mpox files (which are saved in the same folder as the original score file).
This popup is populated automatically from the Windows file system when the dialog is loaded, and whenever an .mpox file is created or deleted (using the appropriate button at the bottom of the dialog). The popup’s width is dynamically allocated, depending on the width of the file names it has to accommodate.
If no .mpox file currently exists for this .capx file, a new one is created containing default options and having a file name ending ‘.1.mpox’.
When an .mpox file is selected here, its name appears not only on the selector popup menu, but also in the title of the dialog.
Each .mpox file contains a set of performance options, and (possibly) a recording. The Play Recording button, at the bottom of the dialog, is enabled or disabled, depending on whether a recording exists or not in this .mpox file.
Any edits made in the dialog are immediately saved to the file on disk. The file does not have to be saved explicitly.
Moritz Performance Options (.mpox) file names are allocated automatically on creation. They have the form intro.number.mpox, where intro is the name of the associated .capx score without the .capx suffix, and number is an integer. New file numbers are allocated to be larger than the number of any existing .mpox file having the same intro.
Providing that the naming conventions are maintained, .mpox filenames can be changed in Windows before running Moritz � for example, to consolidate the version numbers of recordings. Also, .mpox files can be created by copying, editing, splicing etc. the texts of existing ones... These are XML files.
Instrument-Performer selector controlThis popup is populated automatically from the Windows file system when the dialog is loaded, and whenever an .mpox file is created or deleted (using the appropriate button at the bottom of the dialog). The popup’s width is dynamically allocated, depending on the width of the file names it has to accommodate.
If no .mpox file currently exists for this .capx file, a new one is created containing default options and having a file name ending ‘.1.mpox’.
When an .mpox file is selected here, its name appears not only on the selector popup menu, but also in the title of the dialog.
Each .mpox file contains a set of performance options, and (possibly) a recording. The Play Recording button, at the bottom of the dialog, is enabled or disabled, depending on whether a recording exists or not in this .mpox file.
Any edits made in the dialog are immediately saved to the file on disk. The file does not have to be saved explicitly.
Moritz Performance Options (.mpox) file names are allocated automatically on creation. They have the form intro.number.mpox, where intro is the name of the associated .capx score without the .capx suffix, and number is an integer. New file numbers are allocated to be larger than the number of any existing .mpox file having the same intro.
Providing that the naming conventions are maintained, .mpox filenames can be changed in Windows before running Moritz � for example, to consolidate the version numbers of recordings. Also, .mpox files can be created by copying, editing, splicing etc. the texts of existing ones... These are XML files.

The upper panel is populated with the list of staff names from the score (in this
case from BrucknerAdagio.capx). Each
staff corresponds to a MIDI channel (Moritz currently supports up to 16 staves corrsponding
to the standard 16 MIDI channels.) After selecting one or more channel names in
the list, they can be allocated to the Assistant (black), Performer (blue), or neither
(red) using the buttons below the list.
Global Options

This is a new control (October 2010). The comment on the dialog is self-explanatory.
Performer’s Dynamics, Pitch and Keyboard controls

The radio buttons are self explanatory. Selected options are additionally highlighted
in blue. Clicking the Performer’s Keyboard Options button opens the
Performer’s keyboard settings
dialog (see below).
All these options are disabled if none of the score’s staves is set to be performed live.
All these options are disabled if none of the score’s staves is set to be performed live.
Assistant’s Duration Options

The radio buttons are self explanatory. The selected option is additionally highlighted
in blue.
These options are disabled if none of the score’s staves is set to be played by the assistant.
These options are disabled if none of the score’s staves is set to be played by the assistant.
Lower Button Panel (Recording and Playback)

When one of the four central buttons is clicked, they are replaced by a large Stop button as follows.
(The message on the button reflects the button which was clicked.)

New .mpox file: Creates
a new set of options for this score, copying the current set by default, but with
no recording. Adds the new .mpox file name to the list of files in the .mpox file
selector at the top of the dialog.
Record Live: Begins a new, live recording, using the options which have been set in the dialog.
Play Recording: Plays the recording stored in this .mpox file. If there is no such recording, this button is disabled.
Play Symbols: Like Record Symbols except that no recording is saved.
Delete .mpox file: Deletes the current .mpox file, after getting confirmation from the user. Any of the available .mpox files can be deleted. When the last one is deleted, it is immediately replaced by a new one (containing no recording) whose name ends with �.1.mpox�. (The user is told what is going on, of course.)
Record Live: Begins a new, live recording, using the options which have been set in the dialog.
The recording (which is saved in the .mpox file) contains only the temporal information
created while recording. Each (spatial) chord in the score thus has a parallel (temporal)
chord in the recording. Moritz Performance Options (.mpox) files are in fact a parallel
extension of the CapXML format, describing temporal information. CapXML only describes
the physical (spatial) characteristics of symbols. When playing back the recording,
information such as ornaments, or control symbols attached to the chords, are retrieved
from the score and performed in real time, even though they are not in the recorded,
temporal information. So, while playback sounds identical, the recorded, temporal
information is considerably simpler than in MIDI files. This makes it much easier
to edit...
- Recording starts as soon as the user plays on the keyboard. If a previous recording exists, the user is first asked if it should be overwritten. Recordings can, of course, also be backed up by making a copy of the .mpox file before recording.
- Recording ends either when the StopGo node is toggled to Stop in the patch window, or when the large green Stop button in this dialog is clicked, or when the end of the score is reached.
- When the new recording is complete, it is automatically saved in the current .mpox file.
- Timing controls (tempi, accel., rit. etc.), which occur in the score while the assistant is playing alone, are used to calculate the assistant's durations, overriding the current rate of performance. The performer’s durations always override timing controls.
- If the performer performs too fast for the assistant, the assistant leaves chords out in order to keep up. The omitted chords are nevertheless present in the recording, where they have zero duration. This keeps the recorded (temporal) chords parallel to the (spatial) chords in the score.
- If a chord has an ornament, its duration is from its first chordOn to its last chordOff. All chordOffs in a chord's ornament set the duration of the original chord, overriding the duration set by the previous chordOff. So the duration is ultimately the duration set by the last chordOff to be sent. Note however, that some ornament types never send chordOffs, in which case the duration of the chord is “infinite”. Playback ends with the sending of a MIDI All Notes Off message to each channel when the final chord is released.
- The Record Live button is disabled if none of the staves in the score is set to be played by the live performer.
Play Recording: Plays the recording stored in this .mpox file. If there is no such recording, this button is disabled.
Play Symbols: Like Record Symbols except that no recording is saved.
Delete .mpox file: Deletes the current .mpox file, after getting confirmation from the user. Any of the available .mpox files can be deleted. When the last one is deleted, it is immediately replaced by a new one (containing no recording) whose name ends with �.1.mpox�. (The user is told what is going on, of course.)
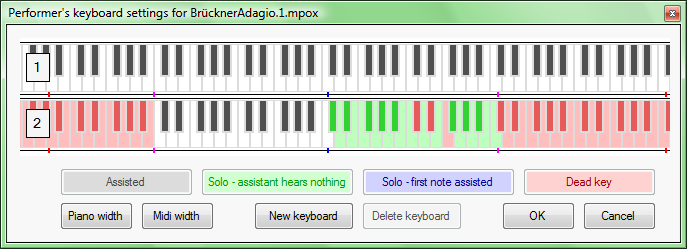
Performer’s Keyboard Settings
This dialog appears when the Performer’s Keyboard Options button, in the Performance Options dialog, is clicked.
This dialog contains a list of keyboards, each of which can be set up to control
how Moritz reacts to incoming MIDI key events.
The list must contain at least one keyboard. The default keyboard is keyboard 1 which, if it is not otherwise set, sets all keys to be assisted (the assistant performer hears everything).
The particular keyboard in use in the score is set by attaching a Moritz keyboard number control to any chord in the score. When Moritz sees the command, it switches keyboards.
The Moritz Keyboard Control command consists of a string either beginning with a single ‘k’ or with the string “keyboard” followed by the keyboard number (e.g. k1, k2, k3, keyboard1, keyboard2, keyboard3 etc.).
Keyboard Settings Dialog Usage:
To add a new keyboard, click ‘New keyboard’. To delete one, select it then click ‘Delete keyboard’. The dialog’s height can increase until it contains 7 visible keyboards. If there are more than that, the height is fixed and the keyboard list becomes scrollable.
The dialog exists in two widths: Piano width (as here), having the keys on a standard piano, and Midi width having keys for all 128 MIDI key numbers. Middle-C is marked with a small blue notch. The top and bottom of a standard piano keyboard are marked with small red notches.
The top and bottom of my 49-key EMU XBoard49 are marked with small magenta notches.
The dialog can be dismissed by clicking OK or Cancel. If OK is clicked, the settings are saved in the current .mpox file.
Key types:
The list must contain at least one keyboard. The default keyboard is keyboard 1 which, if it is not otherwise set, sets all keys to be assisted (the assistant performer hears everything).
The particular keyboard in use in the score is set by attaching a Moritz keyboard number control to any chord in the score. When Moritz sees the command, it switches keyboards.
The Moritz Keyboard Control command consists of a string either beginning with a single ‘k’ or with the string “keyboard” followed by the keyboard number (e.g. k1, k2, k3, keyboard1, keyboard2, keyboard3 etc.).
Keyboard Settings Dialog Usage:
- left-click selects a single key or keyboard (to select a keyboard, click its number or upper or lower boundary
- shift-left-click adds or removes a single key or keyboard from the selection.
- right-click adds a range of keys starting at the nearest selected key.
To add a new keyboard, click ‘New keyboard’. To delete one, select it then click ‘Delete keyboard’. The dialog’s height can increase until it contains 7 visible keyboards. If there are more than that, the height is fixed and the keyboard list becomes scrollable.
The dialog exists in two widths: Piano width (as here), having the keys on a standard piano, and Midi width having keys for all 128 MIDI key numbers. Middle-C is marked with a small blue notch. The top and bottom of a standard piano keyboard are marked with small red notches.
The top and bottom of my 49-key EMU XBoard49 are marked with small magenta notches.
The dialog can be dismissed by clicking OK or Cancel. If OK is clicked, the settings are saved in the current .mpox file.
Key types:
- Black-and-White: The Assistant hears the key. The performer’s MIDI event is sent to MIDI OUT, using the Performer’s Options.
- Green : Solo. The Assistant does not hear the key. The performer’s MIDI event is sent to MIDI OUT, using the Performer’s Options. This is useful, for example to allow the performer to trill or tremolo, or to perform some improvisation.
- Blue : Solo, but the assistant hears the first MIDI event. The performer’s MIDI event is sent to MIDI OUT, using the Performer’s Options. This is a variation of the Green option. Useful, for example to allow the performer to trill or tremolo, or to perform some improvisation.
- Red : A dead key. The Assistant does not hear the key, and Moritz swallows the event, sending nothing to MIDI OUT. Useful for constructing special glissandi etc.
Score Nodes
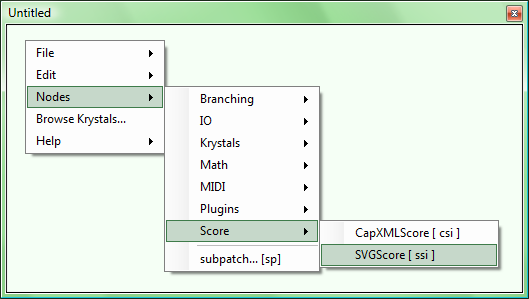
| CapXMLScore |
 Input pins: none Output pin: XMLScoreNamePin Back-panel menu location: Shortcut: csi Uses background thread: no |
Menu:

|
This node represents a musical score in capXML format. When loaded, the score’s
(.capx) file name is displayed on the node. The name is also the value of the single
output pin.
N.B.: The current version of capella (version 6.0 - 14) can both read and write MusicXML files. It can, of course, export capXML files, so converting MusicXML to CapXML is fairly trivial. Depending on the original MusicXML, some tweeking may be necessary...
Non-standard context menu items:
load score: opens a standard file dialog to load a capXML score.
The following commands are enabled when a score has been loaded.
open this score in capella: Opens and displays the score in capella.
about this score: Opens a window displaying the metadata contained in the .capx score file (author, comments and keywords).
| SVGScore |
 Input pins: none Output pin: XMLScoreNamePin Back-panel menu location: Shortcut: ssi Uses background thread: no |
Menu:
|
This node represents a musical score in SVG format. When loaded, the score’s
(.svg) file name is displayed on the node. The name is also the value of the single
output pin.
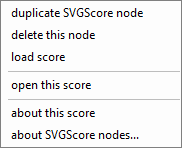
Non-standard context menu items:
load score: opens a standard file dialog to load a score in SVG format.
The following commands are enabled when a score has been loaded.
open this score: Opens and displays the score in the program which has been set to open .svg files (currently my browser).
about this score: Opens a window displaying the metadata contained in the .svg score file (author, comments and keywords).