Assistant Performer
The Assistant Performer, which is started from Moritz’ opening dialog, can perform a score alone or under the control of a live performer. Various options can be set before beginning to perform.
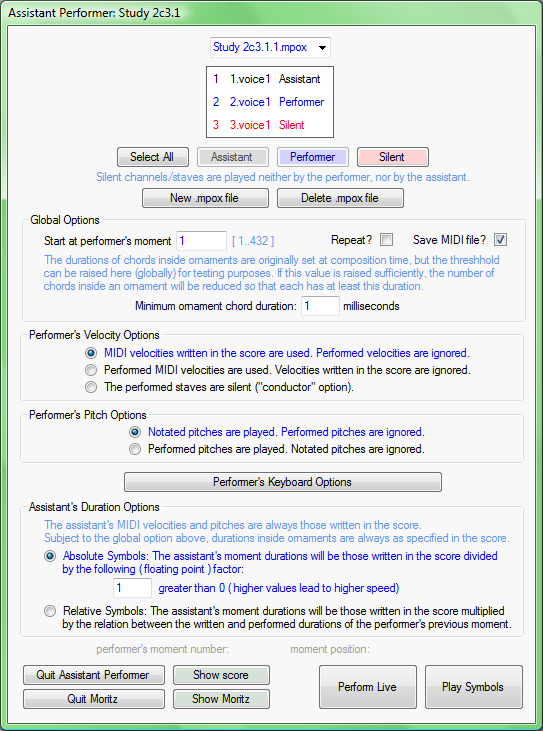
An Assistant Performer dialog associated with the Study 2c3.1 score might, for example, look like this:
This dialog’s main components are, from the top down:
Performer selection: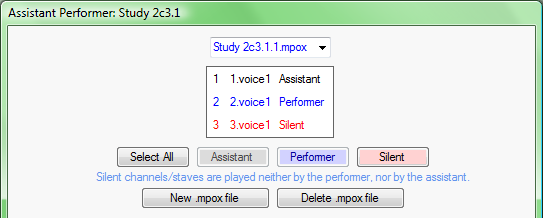
The popup menu at the top contains a sorted list
of Moritz Performance Options (.mpox) files associated with the current score. Each .mpox file contains a particular set of performance options applicable
to the current score. Each score can be associated with any number of
.mpox files (which are saved in the same folder as the original score file). This
popup is populated automatically from the Windows file system when the dialog is
loaded, and whenever an .mpox file is created or deleted (using the appropriate
button at the bottom of this part of the dialog). The popup’s width is dynamically
allocated, depending on the width of the file names it has to accommodate. If no
.mpox file currently exists for this score, a new one is created containing default
options and having a file name ending ‘.1.mpox’. Any edits made in the
dialog are immediately saved to the .mpox file on disk. The file does not have to
be saved explicitly.
The selection panel below the pop-up is populated
with the list of staff/voice names from the score (in this case from Study 2c3.1).
Each voice corresponds to a MIDI channel (Moritz currently supports up to 16 voices
corresponding to the standard 16 MIDI channels, and up to two voices per staff.)
After selecting one or more channel names in the list, they can be allocated to
the Assistant (black), Performer (blue), or neither (red) using the buttons below
the list.
: Creates a new set of options for this
score, copying the current set by default. Adds the new .mpox file name to the list
of files in the .mpox file selector at the top of the dialog.
: Deletes the current .mpox file,
after getting confirmation from the user. Any of the available .mpox files can be
deleted. When the last one is deleted, it is immediately replaced by a new one whose
name ends with �.1.mpox�. (The user is told what is going on, of course.)
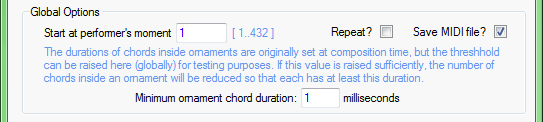
The first input field is used to set the moment number
at which the performance starts. The number is restricted to the number of performer’s
moments, calculated using the options above and the score.
If this is an assistant-only performance, the number of assistant’s moments
is used.
If the Repeat? checkbox is checked, the performance
will repeat (from the beginning of the score).
If the Save MIDI file? checkbox is checked, the performance
will be recorded, and can be saved as a Standard MIDI file.
The Minimum ornament chord duration field can be
used to raise this threshold from its composed value.
(See the help text on the dialog.)

These radio buttons are self explanatory. The selected option is highlighted in
blue.
All these options are disabled if none of the score’s staves is set to be
performed live.

Clicking the button
opens the Performer’s keyboard settings
dialog (see below).
Currently (July 2012), The Performer’s Keyboard Options have no effect. They
are supposed to be controlled by special instructions written into the score, but
these do not currently exist. The dialog has, however, been kept for future use.
This option is disabled if none of the score’s staves is set to be performed
live.
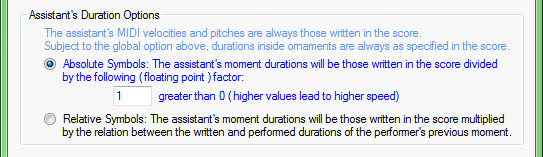
The radio buttons are self explanatory. The selected option is highlighted in blue.
Selecting Relative Symbols allows a live performer
to influence the assistant's speed of execution.
These options are disabled if none of the score’s staves is set to be played
by the assistant.
When not playing, the lower button panel looks like this:

When either of the two buttons on the right is clicked, the other buttons are disabled,
and they are replaced by a large Stop button as in the following screen-shot. If
there is no live performer, the performance begins immediately, otherwise it waits
for the performer. During a performance, the two counters at the top of this section
show the current time. The moment position is the default position of the current
performer’s moment in milliseconds from the beginning of the performance.
(The message on the stop button depends on which start button was clicked.)

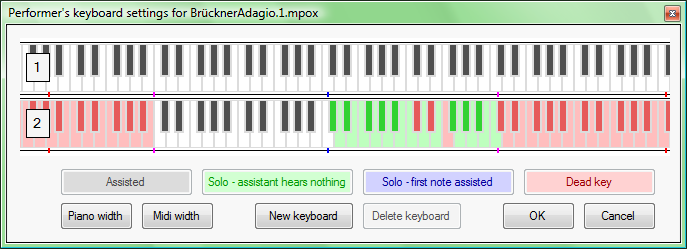
This dialog appears when the button is clicked. The keyboard settings are stored in the current Moritz Performance Options (.mpox) file, but they currently have no effect. They have been kept here for future use.
Originally, the particular keyboard in use in the score was set by attaching a Moritz
keyboard number control text to any chord in the score. When the Assistant
Performer saw the control text, it switched keyboards.
Control texts were invented as a way of augmenting the data in .capXML (standard
notation) files, but I am now using SVG and non-standard notation, and most such
control texts have become redundant. Wanting to start with a clean sheet, I have
temporarily deleted them completely from Moritz’ code-base.
When visible control texts are re-introduced, the number and meanings of the key
types may change. Also, continuous MIDI control messages (expression, volume etc.)
coming from homophonic MIDI controllers such as
AKAI’s EWI need to be dealt with more fully...
By default, the dialog appears in its full width (128 keys) with one default keyboard :

Middle-C is marked with a small blue notch. The top and bottom of a standard piano
keyboard are marked with small red notches. The top and bottom of my 49-key EMU
XBoard49 are marked with small magenta notches.
Individual key types can be edited using the mouse
and dialog buttons (see the help text).
Keyboards can be added and deleted using the buttons provided. If the list contains more than 7 keyboards, the dialog's height is fixed and the list becomes scrollable.
For convenience, the dialog exists in two widths: 128 standard MIDI keys (as above), and the width of a standard piano (as below). Here is how the dialog looks in “Piano width”, with a second keyboard containing edited key types: